
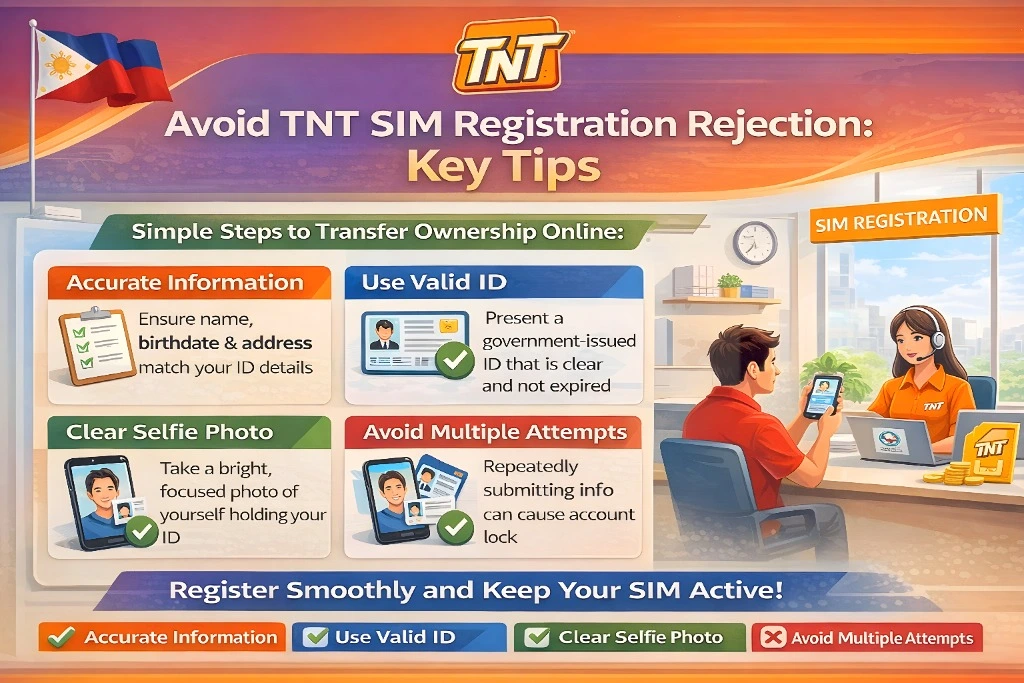
Avoid TNT SIM Registration Rejection: Key Tips
Registering your TNT SIM in the Philippines is now required under the SIM Registration Act. The good news is that it’s usually quick and easy. But many people run into rejections that slow them down.
If your registration got rejected or you’re worried it might, this guide will help you avoid common mistakes and finish registration fast.

Why TNT SIM Registrations Get Rejected
Most rejections happen for just a few simple reasons:
Understanding these common problems helps you fix them before they happen.
Key Tip 1: Match Your Details Exactly
One of the most common reasons for rejection is mismatched personal information.
When registering your TNT SIM, make sure your:
If your name or details are wrong, the system won’t accept your registration.You can also read: How to Avoid TNT SIM Selfie Verification Failures 2026
Key Tip 2: Take Clear, Readable ID Photos
Your ID photos must be clear, sharp, and readable.
Tips for better ID photos:
Take photos in bright light
Avoid shadows on your ID
Make sure edges are visible
Don’t crop out information
Blurry images are one of the top reasons people get rejected.
Key Tip 3: Upload a Good Selfie
The selfie portion helps verify you are really you — so it must be clear.
Selfie Tips:
Face the camera directly
Use good lighting
Remove hats, sunglasses, and filters
Avoid backlight or dark rooms
A poor selfie can trigger a mismatch and cause rejection.
Key Tip 4: Use Correct Photo Format & Size
Some people upload the wrong file type or files that are too large.
Phones often save photos in HEIC format by default. If your phone uses HEIC, convert your files to JPG before upload.
Key Tip 5: Stable Internet Makes a Big Difference
A weak or unstable connection can cause uploads to fail or get corrupted.
Try these:
Use Wi‑Fi if possible
Avoid network interruptions
Switch to mobile data if Wi‑Fi is slow
Uploads that fail partway can trigger rejects.
Key Tip 6: Double‑Check Before Submitting
Before you hit Submit, take a moment to:
Check your name, birthdate, and ID number
Make sure photos are clear
Confirm your mobile number is correct
Ensure you see a success confirmation
This small pause can save you from starting over.
Key Tip 7: Avoid Peak Hours
SIM registration portals tend to slow down when many people are online.
Better registration times:
This reduces delays and upload errors.
Key Tip 8: Try a Different Device or Browser
Sometimes the issue isn’t your info — it’s your browser.
Switch from Safari to Chrome
Try Firefox or Edge
Use a smartphone instead of laptop
A switch often fixes unexpected upload problems.
FAQs
Final Words
Getting your TNT SIM registration rejected can be frustrating, but it doesn’t have to be. Most issues come from simple mistakes that are easy to fix before you submit.
Use clear photos, match your details, and check your connection. Taking a little extra care upfront will save time and help you complete registration fast.
Your TNT SIM registration matters — it keeps your number active, secure, and compliant with the law. With these key tips, you can avoid rejection and stay connected with confidence.